суббота, 10 января 2015 г.

SCM liveCache Initializing

Hi there!

Sometimes, when you try to CIF data from ERP to SCM, error like "a table is unknown or does not exist" can happens.
In my case it was caused by wrong liveCache Initialization (I work with IDES, by the way), so solution is - to repeat liveCache Initializing.

Reference link to SAP help is here.

Incorrect status of previous liveCache Initialization in LC10 looks not like this:


SCM Path: LC10 -- LiveCache monitoring with DBA cockpit:

 
Administration
 

So, first step is better to do - to check some stuffs:

Go to LCA13 -- RFC Connections point (or program SLCA_NON_LC_RELEVANT_CLIENT):


In my case there were three SCM - clients in SCC4 and all three were marked like LiveCache - relevant. I unchecked 001 and 720, and checked one client for work (710):


It made RFC Connections green.
Next step - is to prepare liveCache Initializing launch.
In LC10 -- Integration -- Administration report you need to setup Follow-Up Processing:
/SAPAPO/DELETE_LC_ANCHORS - for Initialize LiveCache and
SLCA_LCK_SYNCHOWNERS - for Start LiveCache


Last thing - check that you have authorization role SAP_BC_LVC_SUPERUSER.

Now it's time to Initialize LiveCache...
Go to LC10 -- LiveCache monitoring with DBA cockpit -- Edit -- Initialize LiveCache:


Next screen looks like this (confirm it):


 liveCache Initialization takes several minutes and after that all unexplainable errors disappeared.

вторник, 25 ноября 2014 г.

Handling deadlines (or Dates) in Delivery and Transportation

Thanks to Andrey Karepanov

Deadlines in delivery and transportation tab - is the place to keep different dates in one place.

The general task looks like this (all actions performed in Delivery):

1.To fulfill Pick-Up Date which represent the date, when Dealer wants to start transportation, to Delivery in field Planned Goods Issue Date (number 1 on the scheme) – this step will be done manually
2.To put (automatically) Planned Goods Issue Date (1) to new field (Delivery Header, Tab Dates) Shipment Begin Plan and Actual Goods Issue Date (2) to Shipment Begin Actual, see a picture below.


Some small things before we start.

In Delivery (Tab Dates) one Event can represent four different moments of time:

- Begin Plan & Begin Actual
- End Plan & End Actual


In the general scheme we defined how delivery dates should correspond with Deadlines. Correspondence of deadlines with Logical time, like Begin & End, Plan & Actual are depicted below:

In customizing, we need to do next operations:

SPRO: Logistics Execution -- Shipping -- Basic Shipping Functions – Scheduling -- Additional Deadlines -- Maintain Deadlines and Events

Specify an alternative name for the logical time (selected times already have existed in my test system):


Go to every time’s details (Magnifier button) and mark checkboxes Read Inline & Write inline, that means deadlines should be read from the application tables:


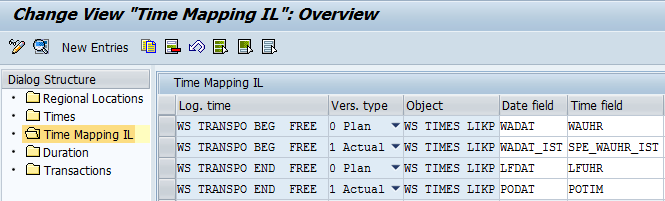
Then go to Time Mapping IL menu, and setup those dates:


For every line, define Date&Time field (from Delivery, LIKP table in this example):

Define Time Segment Procedure:
SPRO: Logistics Execution -- Shipping -- Basic Shipping Functions – Scheduling -- Additional Deadlines -- Create Event Groups

Where you have to select a table in order to define the dates for deadlines (LIKP in this example, in all 4 tables):


Define all events for template in certain order (Sort Sequence):


If checkbox Optional trans. is selected, events appear in delivery only if they are not empty or manually selected and you can delete them.

Also you have to assign Event Groups to Delivery Type:

SPRO: Logistics Execution -- Shipping -- Basic Shipping Functions – Scheduling -- Additional Deadlines -- Assign Event Groups to Delivery Type


Result: dates from delivery (Processing Tab)


Reflect automaticaly in dealines (Dates Tab):


Date 4, is POD date, (proof of delivery) appears if you activate POD functionality.
 
In the next step we will see how to copy deadlines from delivery to shipment.


пятница, 14 ноября 2014 г.

How to setup loopback connection for IDOC and copy characteristics from 300 to 023 class type.

If you have one system and want to test IDOC it is reasonable to setup loopback connection.
In my case I want to achive two things:
1. Create characteristics and classes for batch the same, like I already have in configuration (300 class type).
2. Easiest way for step 1 - is to transfer characteristics (CHRMAS) and classes (CLSMAS) at the same system with change of class type at the end.
Sounds easy... Let's go!

In some cases you may need personalized connection (for example - IDOC ORDERS) with Vendor Partner Number. In this particular case it is enough just Logical system connection.

Make sure, you have LOCAL logical system (SALE -- Basic Settings -- Logical Systems -- Define Logical System)


Create two virtual logical systems

Internal LS for IDOCs-receiver
Internal LS for IDOCs-sender


Create new distribution model in BD64 


Add message type (CHRMAS, CLSMAS)


Create Outbound Partner profile parameters for receiver in WE20(/ER5CLNT999/LS//CHRMAS+CLSMAS)

  • Message type CHRMAS -- Basic type CHRMAS04
  • Message type CLSMAS -- Basic type CLSMAS04


Create Inbound Partner profile parameters for your real system (/DIS_00_710/LS//CHRMAS+CLSMAS)

  • Message type CHRMAS -- Process code CHRM
  • Message type CLSMAS -- Process code CLSM
  •  


    After that, you can transfer characteristics and classes to the same system/client:

    1. BD91 - Send Characteristic - first
    2. BD92 - Send Class  - second

    you also have to change class type from 300 to 023 manually and re-transfer IDOCs thru WE19

    At the end you need assign materials to class in mass by CL24N - Assign Objects/Classes to Class 

    среда, 21 мая 2014 г.

    ERP <--> SCM integration tricks

    BALHDR Duplicate Records

    During Integration Model Activation (CFM2), espessially if you are playing with IDES, error message can appears:

    • SAP SQL Insert Duplicate Records

    Or short Dump (check both systems, ERP and SCM)

    • SAPSQL_ARRAY_INSERT_DUPREC
    The reason could be difference between current number of records BALHDR-table, t-code SLGN
    You should implement note:

    196113 - SAPSQL_ARRAY_INSERT_DUPREC, BALHDR


    Errors clarifying

    During Integration Model Activation (CFM2), you can have general errors, like this (ERP system):
    To have more information, you can go to SCM system, t-code /SAPAPO/CC Core Interface Cockpit, where error is more detailed:


    After error correction you have to delete Queues with errors (t-code SMQ1) and re-launch activation.


    четверг, 8 мая 2014 г.

    IDOC Data Filtering

    If you are going to transfer IDOC-s between systems, you may be need to restrict data during it.
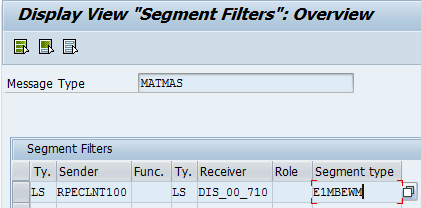
    In my case I want to transfer only one valuation type for material (MATMAS, segment E1MBEWM, field BWTAR).
    By the way, to block all valuation type segments  you can use t-code BD56 (table TBD20):


    To activate filter, in BD64 (change mode) double click on "No filter set":

    In pop-up screen push "Create Filter Group"

    Then  double click on field and populate the values, you want to transfer:

    To extend the filter values, you need to do additional steps.

    In SWO1 define business object you want to handle (for MATMAS - BUS1001001) --> Display --> Methods --> Clone (doubleclick) --> ABAP tab --> Name (doubleclick) --> Tables tab --> Associated Type (for example BAPIE1MBEWRT) --> Component (for example VAL_TYPE = BWTAR)

    Now in BD95 create new entry based on data, defined in SWO1, save it:

    In BD59 point message type (MATMAS):

    and create new entry with new field, save:

    Result in BD64 field Valuation Type is in filter now:


    среда, 7 мая 2014 г.

    How to connect two systems for IDOC interaction

    In this post you will know, how to setup connection between two clients (SAP system - the same) for IDOC interaction (Message type MATMAS).
    As usual, installed IDES SAP system has at least two clients with data. In my case - IDES DI/MILL PRODUCTS 2011 installed and I have next clients: 
    • 710 Discrete Industries
    • 720 Mill Products
    In t-code SM59 you need to setup ABAP RFC Connections:
    from 710 client - MIL_00_720
    from 720 client - DIS_00_710

    Technical settings from 710 client for MIL_00_720 connection:
    1- Target host, 2- Instance number

    Logon & Security:
    Client (720), User (IBS_RFC - standard IDES user), Password - minimum 8 digits

    Unicode: Is better to mark Unicode radiobutton

    Connection test:

    Also you should do the same for DIS_00_710 connection from 720 client.

    Next step - setup in 710 client distribution model  for MATMAS IDOC in t-code BD64
    Create model view:
    Add message type (MATMAS):
    Add message type (SYNCH) - you need it for distributing:

    Result:

    Next step - setup in 710 - Generate Partner Profile for model view


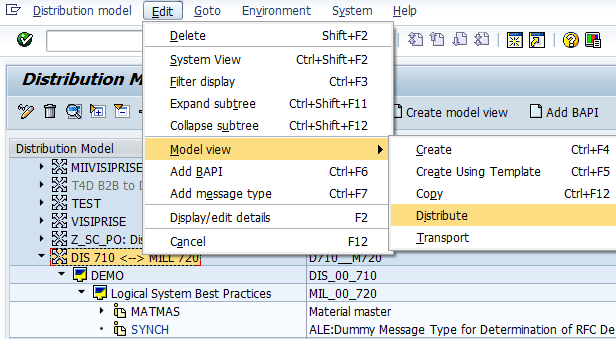
    Next step - setup in 710 - Distribute model view to 720 client (after Save):


    After that model view D710__M720 appears in 720 client:

    Now you should generate partner for distribution model in 720 client:


    Test material transfer from 710 to 720 client (BD10):

    WE05 in 720 client

    For MATMAS IDOC is possible to see error log in MM90
    One more usefull t-code - BD12 for customer distribution (IDOC DEBMAS)

    More customizing can be done here:

    SPRO -- Application Server -- IDoc Interface / Application Link Enabling (ALE)

    -- Modelling and Implementing Business Processes -- Global Organizational Units -- Cross-System Company Codes

    -- Modelling and Implementing Business Processes -- Converting Data Between Sender and Receiver