понедельник, 2 ноября 2020 г.

S4 Migration Cockpit - download stock (Material inventory balance)

 T-code LTMC. To proceed the stock create new migration project


Select migration object Material inventory balance

Download template


Populate those file


Upload it


Activate it


And transfer


Looks it's more-or-less Ok


On the mapping screen select all lines and confirm them


Go Next


Simulation step is Ok

On the next step there is some error

Missing settings of migration key date for company code RU01
Message no. CNV_DMC_SIN484


A couple notes about that

2754615 - SAP S/4HANA Migration Cockpit: Information about Fix Posting Date
2768330 - Missing settings for migration key date for company code

It says that you need to setup company code for migration in transaction FINS_MIG_CTRL_1


Repeat simulation again - looks good


Push next on the Export stage


Process status if Finished


Let's check the result in MB52


As material with batch management - the batch was created wit the same valuation type


The file you can find here - XML file from example.


You can upload special stock and serial numbers as well, here in template required data added (Material Document Item - tab, K-vendor consignment, Vendor themselves, Serial Numbers)


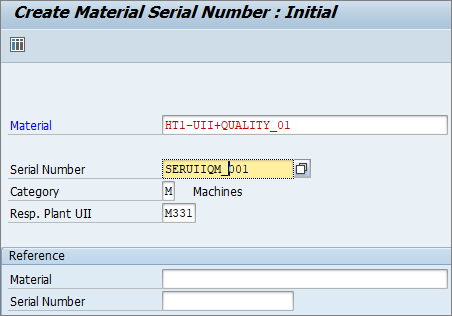
The Serial Numbers should be created in the system (IQ01).
In case of SN - materials, material qty = 1 per line.


вторник, 13 октября 2020 г.

First touch of S/4 HANA Migration Cockpit

Before all, please keep in mind, that data migration cockpit does not support internal number ranges, only external number range can be used (S4 cloud versions - does have Migration Object Product with internal number range):

2565362 - SAP S/4HANA Migration cockpit: Material changes from internal to external numbering


To run Migration Cockpit, hit the transaction LTMC, system will jump to browser

In case you see 403 Forbidden – don't be scared, just activate web-service dmc_wda (SICF).

Also check that others are active dmc_wda_gaf, 

/sap/bc/webdynpro/sap/DMC_WDA – Migrate Your Data
/sap/bc/webdynpro/sap/DMC_WDA_GAF – Guided Activity for Migration Object

The full path looks like that (888 - client)

/sap/bc/webdynpro/sap/dmc_wda?WDCONFIGURATIONID=DMC_WDA_APP&sap-client=888&sap-language=EN#

Create new project


Give your project a name


Select migration Object


Jump over the warning

Download template (*.xml file, edit with Excel)

Populate the file (different tabs are possible)


Upload the file populated earlier


Select line with uploaded file and hit Activate and Start Transfer


Jump over the message

You will see the beautiful progress bar


There are some errors:


So, the Error is
Field Material views on sheet Basic Data is not provided  Message no. CNV_DMC_SIN394

Some information about the matter here:

2554475 - SAP S/4HANA Migration Cockpit: Missing material views (e.g. Basic data) or additional views created you does not want to have

Possible material views (maintenance status)
A = Work Scheduling;
B = Accounting;
D = MRP;
E = Purchasing;
F = PRT;
G = Costing;
K = Basic;
L = Storage;
P = Forecast;
Q = QM;
S = Warehouse management;
V = Sales.

The best way to define material maintenance status - is to create material master manually and check field MARA-VPSTA


The normal result at this stage looks like below


On the next step you can repeat the procedure for all red coloured lines one-by-one:

Hit active link in the Name column, for ex. Mapping of Purchasing Group, on the next screen
1 - select line 2 - hit tick 3 - Save


Another option - select all lines and hit Confirm Mapping Values. Every new mapping appears one time, so if you will be upload same fields again no bothering.


Hit Next, Data Simulation progress bar will appear:


Success story


The file from the article is here.
Cheers!


понедельник, 12 октября 2020 г.

Serial Number with Item Unique Identification (IUID)


1. SFW5 - activate the next business function sets

        ERP_UID_01 - Item Unique Identification

        ERP_UID_02 - Item Unique Identification (Additional Functions)

        ERP_UID_03 - IUID, Registry and Supplier Communication 


2. Define UID Handling

SPRO: Logistics - General -- Item Unique Identification (IUID) -- Define UID Handling


3. Tick the checkbox IUID Compatible and Display UII under IMG menu

SPRO -- Plant Maintenance and Customer Service -- Master Data in Plant Maintenance and Customer Service -- Technical Objects -- Serial Number Management -- Define Serial Number Profiles


4. Configure UII type if you need new one

SPRO -- Logistics - General -- Item Unique Identification (IUID) -- Define Item Unique Identification Type


5. Select SN profile, tick the checkbox IUID relevant and select IUID type:


6. Create Serial Numbers in IQ01 for your material


7. After that you can maintain those SNs in documents, for example Purchase Order on the item level, Delivery Schedule Tab, batch is required:


понедельник, 27 июля 2020 г.

Logmein Hamachi installation / configuration / start steps on RHEL from command line

The installation procedure is described here (except RPM-file path)
https://laptrinhx.com/install-and-configure-logmein-hamachi-on-rhel-centos-5-6-2377262859/

RPM-file path is taken from here (64 bit version)
https://www.vpn.net/installers/logmein-hamachi-2.1.0.203-1.x86_64.rpm

Step 1: Download Required RPM Packages
Under the root user run command
# wget https://www.vpn.net/installers/logmein-hamachi-2.1.0.203-1.x86_64.rpm

Step 2: After files dowloaded, run command to install
# rpm -ivh logmein-hamachi-2.1.0.203-1.x86_64.rpm

Step 3: After installation Start Hamachi Service (good result: starting - success)
# /etc/init.d/logmein-hamachi start

Step 4: Join Hamachi Existing Network
# hamachi login
Logging in .......... ok

# hamachi join 111-222-333
Password:<required, doesnt work w/o pass>
Joining 111-222-333 .. ok

Step 5: Check Hamachi Status and Details
# hamachi

To check the current joined network and other details about that network
# hamachi list

воскресенье, 12 июля 2020 г.

The very first steps after S4 HANA installation


Client copy. 
I am not sure, but I guess even for training purposes you need to setup new client besides 000 because some actions can not be done there.
So, first create a new line in SCC4


Also you need to create / populate Logical system (SALE--Basic Settings--Logical Systems--Define Logical System)


Then, make copy in SCCLN under user SAP*

When client copy completed, you will see such a picture:
Setup Transport Management System

Enter transaction STMS and confirm default options (under SAP*)

To check TMS system, use SE38 program RSTPTEST

If everything is Ok,you will see the screen with STMS import queue


Import profiles

In RZ10 select Utilites -- Import profiles -- Of active servers


Create basic parameters for default profile that will make it possible to work from the browser

 
 is/HTTP/virt_host_0
 
 s4host.rhel:8075
 
 icm/server_port_0
 
 PROT=HTTP,PORT=8075,TIMEOUT=180,PROCTIMEOUT=600

 icm/host_name_full    
 s4host.rhel
 
 icm/server_port_2
 
 PROT=HTTPS,PORT=8070,TIMEOUT=180,PROCTIMEOUT=120
 icm/server_port_1
 PROT=SMTP,PORT=25000,TIMEOUT=180,PROCTIMEOUT=120
 
 ms/server_port_0
 PROT=HTTP,PORT=8075
 
 is/SMTP/virt_host_0
 
 *:25000

Memory parameters
abap/shared_objects_size_MB 3000
PHYS_MEMSIZE 194555
abap/buffersize 2500000

You can check the result by NWBC link (some SICF nodes might need to activate)


or


Assign the following roles to your user so that the first screen will not be blank

SAP_BPR_INT_SALES_REP_14
SAP_SR_INT_SALES_REP_5
SAP_SR_INT_SALES_REP_6

So, the result is OK


Let's activate Fiori environment
Prerequisites for Fiori 3 System Landscape (details here)
SAP S/4HANA with embedded SAP Fiori front-end server with Installed components 
SAP_UI 754
UIBAS001 500

Will pass steps from note
2834415 - Composite SAP note: Rapid Activation for SAP Fiori in SAP S/4HANA 1909

Run tr. SU25 and select Initially fill the Customer Tables point with default option


After that I've activated all regarding the article 


суббота, 11 июля 2020 г.

How to run S4 HANA environment (HDB & application server)


Start sequence

1. under database user s4dadm
s4host:~ # su - s4dadm
s4dadm@s4host:/usr/sap/S4D/HDB00> HDB start

2. under application server user s4hadm
su - s4hadm
s4host:s4hadm 51> /usr/sap/S4H/D01/exe/sapcontrol -prot NI_HTTP -nr 01 -function Start
s4host:s4hadm 51> /usr/sap/S4H/ASCS02/exe/sapcontrol -prot NI_HTTP -nr 02 -function Start

Stop sequence

1. under application server user s4hadm
su - s4hadm
s4host:s4hadm 51> /usr/sap/S4H/ASCS02/exe/sapcontrol -prot NI_HTTP -nr 02 -function Stop
s4host:s4hadm 51> /usr/sap/S4H/D01/exe/sapcontrol -prot NI_HTTP -nr 01 -function Stop

2. under database user s4dadm
s4host:~ # su - s4dadm
s4dadm@s4host:/usr/sap/S4D/HDB00> HDB stop

Run processes check
s4host:~ # su - s4dadm
s4dadm@s4host:/usr/sap/S4D/HDB00> sapcontrol -nr 01 -function GetProcessList

Should be something like this...
GetProcessList
OK
name, description, dispstatus, textstatus, starttime, elapsedtime, pid
disp+work, Dispatcher, GREEN, Running, 2020 06 22 10:26:58, 0:02:58, 8795
igswd_mt, IGS Watchdog, GREEN, Running, 2020 06 22 10:26:58, 0:02:58, 8796
gwrd, Gateway, GREEN, Running, 2020 06 22 10:27:01, 0:02:55, 8815
icman, ICM, GREEN, Running, 2020 06 22 10:27:01, 0:02:55, 8816

VBox tricks / UUID change
CD C:\Program Files\Oracle\VirtualBox\
C:\Program Files\Oracle\VirtualBox>VBoxManage internalcommands sethduuid "E:\RHEL8\RHEL8.vdi"

To grant folder's authorisation in Linux, the next commands use:
chmod a-x,g+w file
or
chmod ug=rw,o=r file
the steps under root user are:
chmod a-x,g+w  /usr/sap/trans/EPS/in
chmod -R 777 /usr/sap/trans/EPS/in