Special thanks to Andrey Karepanov
and Carlos Pería
Web Service Reliable Messaging (WSRM) provide the connection between systems directly, without XI/PI system.
In my case the general landscape consist of three systems: ERP with EHP5, Transportation Management (TM) 9.0 and SCM, but in the integration two of them - ERP and TM partisipate.
So, the purpose of this article is to take you through the configuration to finally send an Order based transportation requirement (OTR) from the ERP to the TM system.
The basis components looks like this (t-code SPAM):
ERP with EhP5
Netweaver 7.31 with TM 9.0 Add-on
I strongly advise you to have the highest SAP_BASIS level in both systems.
Prerequisites
RFC-destinations
Before following the steps I recommend to set up RFC destinations between ERP and TM, although it is not clear where it used (after successful WSRM integration I disrupted RFC and it worked anyway) I think RFC destinations participates only in the Core Interface (CIF).
Business function activation
For a TM, ERP, and EWM system, make sure that the business function FND_SOA_REUSE _1
is activated to enable WS/RM usage in these systems.
In TM you need to activate the next business functions:
/BCV/MAIN – FND, Business Context Viewer
/BCV/MAIN_1 – FND, Business Context Viewer 2
FND_VISUAL_BUSINESS – Visual Business
SCM_SAPTM_SCMB_FND – SAP TM-Specific Enhancements in SCM Basis
Block 1. Basic Settings for SAP TM system
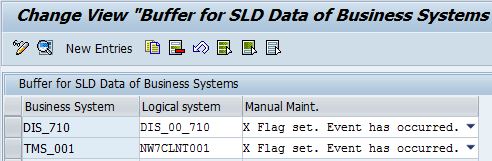
Step 1. Defining System Landscape Directory (SLD) Data of Business Systems
In Customizing for SAP TM, choose:
SAP Transportation Management -- Transportation Management Integration -- Define SLD Data of Business Systems
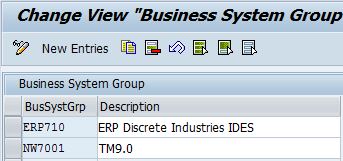
Step 2. Maintaining Business System Groups
In Customizing for SAP TM, choose:
SAP Transportation Management -- SCM Basis -- Integration -- Basic Settings for Creating the System Landscape -- Maintain Business System Group
Step 3. Assigning Logical Systems and Queue Types
In Customizing for SAP TM, choose:
SAP Transportation Management -- SCM Basis -- Integration -- Basic Settings for Creating the System Landscape -- Assign Logical System and Queue Type
Step 4. Activating Queues
In SAP TM, call the QIN scheduler using transaction SMQR and register queue CF*
Block 2. Set up SLD
SLD is located on the Java instance, so you need separate Java server for that.
I think SLD configuration needs are only temporary - it's not necessary during documents interchange.
Related SLD settings consist of two parts:
- connect your systems to SLD and
- add systems to SLD
To connect the ABAP system to SLD, you need execute RZ70 from that system. Specify the Host of your Java - instance and service sapgw00:
Maintain SLD access data: t-code SLDAPICUST, point Hostname to Java server and port:
Check list of RFC-destinations: SLD_NUC, SLD_UC, LCRSAPRFC, SAPSLDAPI (type T).
After customizing you can check correctness in t-code SLDCHECK
My SLD - is the part of Solution Manager and configuration performs under the path:
http://solman.mycloudnas.com:50000/webdynpro/dispatcher/sap.com/tc~sld~wd~main/Main
The next steps explain how to add systems to SLD.
Step 1. Add a new technical system (for example - NW7 = the TM system presented)
Step 2. Select the type of technical system you want to create -- Web AS ABAP
Step 3. Specify the Technical System Details (Web AS АВАР Name (SID), Installation Number, Database Host Name)
Step 4. Enter information about the message server and the central application server (Host Name, Message Server Port - parameter rdisp/msserv_internal in RZ10, Instance number)
Step 5. Optional: Define additional application servers - no other servers for my landscape
Step 6. Enter at least one client with Logical Client Number
Step 7. Select products that are installed in this business system (at least one obvious product)
Step 8. Select the role of this business system
Repeat steps 1-8 to add ERP system to SLD.
Block 3. Technical Setup of the Web Services Runtime
All systems participating in the interaction must undergo a Web Services Runtime procedure, for example - NW7 = the TM system presented.
Step 1. Run technical configuration
Run t-code SRT_ADMIN in 000 client with options:
Step 2. Check the result of the WS runtime
It's also SRT_ADMIN with options:
Step 3. Web Services Runtime tuning
On the next screen you can see whether is everything OK. For most points in the "text" column you can "drill-down" for a detailed setup. It's enough to have ticks for 000 and your working client.
Block 4. Central Business Scenario Configuration
Most customizing of this block performs in SOAMANAGER.
Step 1. Configure one system as the central system
You should configure one system as the central system. Use the system with the highest NetWeaver release.
In my case NW7 will be the central system (please refer the scheme at the beginning of the article).
NW7 = ehp5.tpc.com:8002 - central system
ER5 = ehp5.tpc.com:8000 - managed system
In the central system (NW7) select:
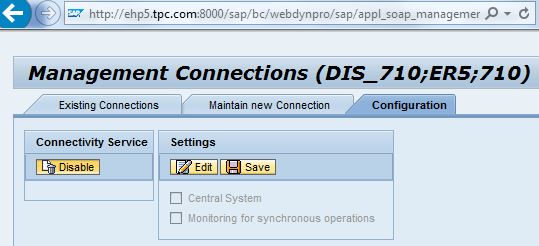
Management Connections - Management Connections - Configuration:
Select "Central system" and save, also enable Connectivity Service:
After a while, the new connection will appear in the list (Existing Connections tab) and main screen title will change to Central SOA Management
Step 2. Configure managed system(s)
In the managed system (ER5) select:
Management Connections - Configuration and enable Connectivity Service:
At the Maintain New Connection tab populate Hostname, Portnumber, Protocol, Client and Start Setup:
After a succesful configuration you will see two connections in the central system:
And one connection in managed system:
Step 3. Create a Domain in Central System
A domain can only be created in the system which is marked as central system.
If Connections are customized correctly, they will be seen at the Domain Systems screen:
At the Domain screen choose Create
And specify domain name, priority and description
On the next screen select systems from the list and specify Authentication Method (User ID/Password):
Step 3. Create a Central Business Scenario ConfigurationChoose create and specify scenario name (only letters).

On the next screen, under the "Connections" block click "Create":
Select Consumer system = ER5_710, Provider system = NW7_001, Service group = TM_ERP_ORDINT & TM_ERP_ORDINT_SE (TM_ERP* pattern):
Add both Service Groups to the Connections list:
You also can define Service Definitions (Provider Configurations block):
And very important - release your scenario to the managed system, green traffic light will appear if everything is correct:
It is also possible to transfer your settings to managed system through Central Change Processor (Central Administration tab), but in this case it will be all settings, not just scenariou's ones.
I also advise you to ping the scenario (

), if everything is OK, you will see something like this:
Another check is Bindings (

), and correct result will be like this:
Errors meanings:
Yellow - settings are not transfered to the managed system:

Red -
Logon Data Assignments problem, check the existence of the Logon Data profile (Service administration -- Logon Data Management). Logon Data settings should be the same as Domain Authentication.
Step 4. Setup Matching interfaces in the Managed System
In the managed system choose
Tools -- Matching interfaces
If your Matching Interfaces screen is empty for service groups TM_ERP_ORDINT & TM_ERP_ORDINT_SE like this:
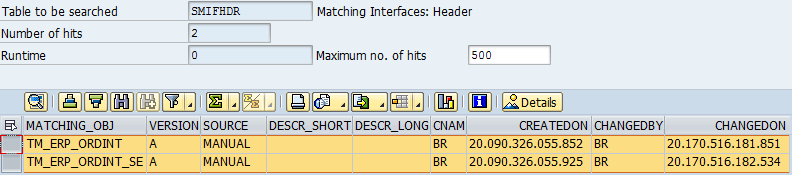
then you should create the appropriate records in the table
SMIFHDR for TM_ERP_ORDINT
and TM_ERP_ORDINT_SE:
Then, follow the t-code
SMIF and create Matching Interfaces for service groups TM_ERP_ORDINT & TM_ERP_ORDINT_SE
Outbound records for Service Group TM_ERP_ORDINT
| TransportationRequestSUITESimulateRequestConfirmation_Out |
http://sap.com/xi/APPL/Global2 |
| SLO_TransportationRequestSUITERequest_Out |
http://sap.com/xi/APPL/Global2 |
| CRP_TransportationRequestSUITERequest_Out |
http://sap.com/xi/APPL/Global2 |
| CRP_TransportationRequestSUITECancellationRequest_Out |
http://sap.com/xi/APPL/Global2 |
| SLO_TransportationRequestSUITECancellationRequest_Out |
http://sap.com/xi/APPL/Global2 |
| POP_TransportationRequestSUITERequest_Out |
http://sap.com/xi/APPL/Global2 |
| POP_TransportationRequestSUITECancellationRequest_Out |
http://sap.com/xi/APPL/Global2 |
Inbound records for Service Group TM_ERP_ORDINT
| IntracompanyTransportationRequestSimulateRequestConfirmation_In |
http://sap.com/xi/TMS/Global |
| IntracompanyTransportationRequestRequest_In |
http://sap.com/xi/TMS/Global |
| IntracompanyTransportationRequestRequest_In |
http://sap.com/xi/TMS/Global |
| IntracompanyTransportationRequestCancellationRequest_In |
http://sap.com/xi/TMS/Global |
| IntracompanyTransportationRequestCancellationRequest_In |
http://sap.com/xi/TMS/Global |
| IntracompanyTransportationRequestRequest_In |
http://sap.com/xi/TMS/Global |
| IntracompanyTransportationRequestCancellationRequest_In |
http://sap.com/xi/TMS/Global |
Outbound records for Service Group TM_ERP_ORDINT_SE
| ODP_TransportationRequestSUITECancellationRequest_Out |
http://sap.com/xi/APPL/SE/Global |
| ODP_TransportationRequestSUITERequest_Out |
http://sap.com/xi/APPL/SE/Global |
| InboundDeliveryConfirmation_Out_V1 |
http://sap.com/xi/APPL/SE/Global |
| IDP_TransportationRequestSUITECancellationRequest_Out |
http://sap.com/xi/APPL/SE/Global |
| IDP_TransportationRequestSUITERequest_Out |
http://sap.com/xi/APPL/SE/Global |
Inbound records for Service Group TM_ERP_ORDINT_SE
| IntracompanyTransportationRequestCancellationRequest_In |
http://sap.com/xi/TMS/Global |
| IntracompanyTransportationRequestRequest_In |
http://sap.com/xi/TMS/Global |
| InboundDeliveryConfirmation_In_V1 |
http://sap.com/xi/TMS/Global |
| IntracompanyTransportationRequestCancellationRequest_In |
http://sap.com/xi/TMS/Global |
| IntracompanyTransportationRequestRequest_In |
http://sap.com/xi/TMS/Global |
Save & Activate and you will see in SOAMANAGER:
Step 5. Setup Logical Port in the Managed System
In the managed system we need to check (or setup) that Logical Port marked as default logical port for every Consumer Proxy.
SOAMANAGER -- Service Administration -- Web Service Configuration -- Select Service Group (TM_ERP_ORDINT)
And drill-down to the next screen:
Copy Consumer proxy names
CO_PUR_POP_TRANSPORTATION_REQU
CO_PUR_TRQ_SUITEREQUEST
CO_SAPPLCO_SLO_TRANSPORTATION
CO_SLS_CRP_TRANSP_REQUEST
CO_SLS_CRP_TRQ_SUITEREQUEST
CO_SLS_TRQ_SUITEREQUEST
CO_TRQ_SUITE_SIM_REQ
Then return to the selection screen again and select those Consumer proxies:
Jump to every Consumer proxy and check (or setup) Logical Port as the Default:
Repeat steps for TM_ERP_ORDINT_SE Service Group.
After that, you will be able to transfer Order Based Transportation Requirement from ERP to TM system.
Sales Order Output Type TRS0 in ERP system:
SRT_MONI in ERP:
SRT_MONI in TM:
You might also like:
Handling deadlines (or Dates) in Delivery and Transportation
SAP Transportation Management 9.0 Installation from scratch. Part 1: Standalone installation