Thanks to Andrey Karepanov
Deadlines in delivery and transportation tab - is the place to keep different dates in one place.
The general task looks like this (all actions performed in Delivery):
1.To fulfill Pick-Up Date which represent the date, when Dealer wants to start transportation, to Delivery in field Planned Goods Issue Date (number 1 on the scheme) – this step will be done manually
2.To put (automatically) Planned Goods Issue Date (1) to new field (Delivery Header, Tab Dates) Shipment Begin Plan and Actual Goods Issue Date (2) to Shipment Begin Actual, see a picture below.

Some small things before we start.
In Delivery (Tab Dates) one Event can represent
four different moments of time:
- Begin Plan & Begin Actual
- End Plan & End Actual

In the general scheme we defined how delivery
dates should correspond with Deadlines. Correspondence of deadlines with Logical time, like Begin
& End, Plan & Actual are depicted below:
In customizing, we need to do next operations:
SPRO: Logistics Execution -- Shipping -- Basic
Shipping Functions – Scheduling -- Additional Deadlines -- Maintain Deadlines
and Events

Go to every time’s details (Magnifier button)
and mark checkboxes Read Inline & Write inline, that means deadlines should
be read from the application tables:

Then go to Time Mapping IL menu, and setup those dates:
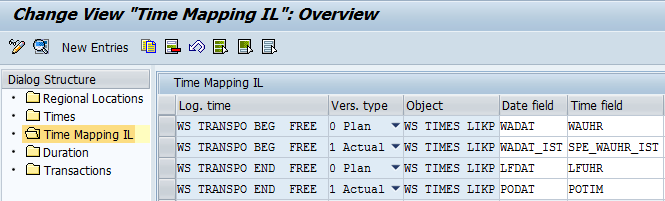
For every line, define Date&Time field (from Delivery, LIKP table in this example):

Define Time Segment Procedure:
SPRO: Logistics Execution -- Shipping -- Basic Shipping Functions – Scheduling -- Additional Deadlines -- Create Event Groups

Where you have to select a table in order to define the dates for deadlines (LIKP in this example, in all 4 tables):

Define all events for template in certain order (Sort Sequence):

If checkbox Optional trans. is selected, events appear in delivery only if they are not empty or manually selected and you can delete them.
Also you have to assign Event Groups to Delivery Type:
SPRO: Logistics Execution -- Shipping -- Basic Shipping Functions – Scheduling -- Additional Deadlines -- Assign Event Groups to Delivery Type

Result: dates from delivery (Processing Tab)

Reflect automaticaly in dealines (Dates Tab):

Date 4, is POD date, (proof of delivery) appears if you activate POD functionality.
In the next step we will see how to copy deadlines from delivery to shipment.


