In VMS (Vehicle Management System) an End Customer is represented by new entity - Business Partner (further abbreviated BUP1-Customer). But BUP1 End Customer can not be used in sales (or purchasing) documents, as well as ordinary Sold-To or Ship-To Parties (let's call them XD02-Cusomers) without hardcode.
For example, in Fleet process you are going to count discount regarding quantity of cars, participating in fleet deal. Even if a basic partner is a Dealer (XD02-Customer), fleet-discount is attached to Fleet End Customer.
Fortunatelly, SAP provides such a tool to create automatically XD02-Customer from BUP1-Customer and vice versa (as well as XK02-Vendor from BUP1-Vendor). The process called Master data synchronization (SAP Help Link).
There is a picture below, which represenst a several data blocks that should be considered for fleet customer in both BUP1 & XD02 places (Name, Sales characteristics, TAX number, partner roles).
In this article I'm going to explain about a simple creation XD02 Customer from BUP1 Customer.

Top-level of customizing steps you can find here:
SPRO -- Cross-Application Components -- Master Data Synchronization
Step 1
Master Data Synchronization -- Synchronization Control -- Preparatory Steps for Synchronization Control
Inside IMG-Help jump to Activate Creation of Postprocessing Order

And activite next items:
AP-MD CVI_01
AP-MD CVI_02
AP-MD CVI_03
AP-MD CVI_04
 Step 2
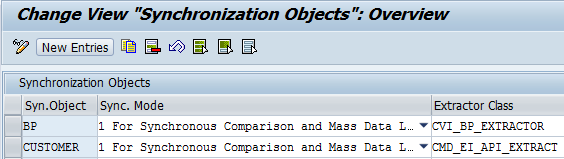
Master Data Synchronization -- Synchronization Control -- Synchronization Control -- Synchronization Objects
Select (or check) the next items:
Step 3
Master Data Synchronization -- Synchronization Control -- Synchronization Control -- Activate PPO Requests for Platform Objects in the Dialog

Step 4
Master Data Synchronization -- Synchronization Control -- Synchronization Control -- Activate Synchronization Options

Step 5
Master Data Synchronization -- Synchronization Control -- Preparatory Steps for Synchronization Control
Inside IMG-Help complete the procedure under Registration of Queues for Background Processing block
Define Queue patterns:

Jump to queue processing and register patterns (t-code SMQR)

Step 6
Master Data Synchronization -- Customer/Vendor Integration -- Preparatory Steps for Customer-Vendor Integration
Inside IMG-Help complete the procedure.
 Step 7
Master Data Synchronization -- Customer/Vendor Integration -- Business Partner Settings -- Settings for Customer Integration -- Field Assignment for Customer Integration -- Assign Keys -- Define Number Assignment for Direction BP to Customer
For both, grouping and account group, number ranges should be the same.
 Step 8
Master Data Synchronization -- Customer/Vendor Integration -- Business Partner Settings -- Settings for Customer Integration -- Field Assignment for Customer Integration -- Assign Keys -- Define Number Assignment for Direction Customer to BP
 Step 9
It is very important to have the same fields attributes for both - BUP1 & XD02 customers.
Path to Configure Field Attributes per Activity for Business Partner Field Groupings:
SPRO: Flexible Real Estate Management (RE-FX) -- Business Partner -- General Settings for Business Partner -- Business Partner -- Basic Settings -- Field Groupings -- Configure Field Attributes per BP Role [for FLCU01] & Configure Field Attributes per Activity [for 01 activity]
Path to Configure Field Attributes per Activity for Customer Account Group (ZVFL):
SPRO: Logistics - General -- Business Partner -- Customers -- Control -- Define Account Groups and Field Selection for Customers (t-code OVT0)
The result
In t-code BUP1 we create business partner (General Data):
 Sales and Distribution data:

After Save, XD02 Customer is been creating with the same data views:


For example, in Fleet process you are going to count discount regarding quantity of cars, participating in fleet deal. Even if a basic partner is a Dealer (XD02-Customer), fleet-discount is attached to Fleet End Customer.
Fortunatelly, SAP provides such a tool to create automatically XD02-Customer from BUP1-Customer and vice versa (as well as XK02-Vendor from BUP1-Vendor). The process called Master data synchronization (SAP Help Link).
There is a picture below, which represenst a several data blocks that should be considered for fleet customer in both BUP1 & XD02 places (Name, Sales characteristics, TAX number, partner roles).
In this article I'm going to explain about a simple creation XD02 Customer from BUP1 Customer.
Top-level of customizing steps you can find here:
SPRO -- Cross-Application Components -- Master Data Synchronization
Step 1
Master Data Synchronization -- Synchronization Control -- Preparatory Steps for Synchronization Control
Inside IMG-Help jump to Activate Creation of Postprocessing Order
And activite next items:
AP-MD CVI_01
AP-MD CVI_02
AP-MD CVI_03
AP-MD CVI_04
Master Data Synchronization -- Synchronization Control -- Synchronization Control -- Synchronization Objects
Select (or check) the next items:
Step 3
Master Data Synchronization -- Synchronization Control -- Synchronization Control -- Activate PPO Requests for Platform Objects in the Dialog
Step 4
Master Data Synchronization -- Synchronization Control -- Synchronization Control -- Activate Synchronization Options
Step 5
Master Data Synchronization -- Synchronization Control -- Preparatory Steps for Synchronization Control
Inside IMG-Help complete the procedure under Registration of Queues for Background Processing block
Define Queue patterns:
Jump to queue processing and register patterns (t-code SMQR)

Step 6
Master Data Synchronization -- Customer/Vendor Integration -- Preparatory Steps for Customer-Vendor Integration
Inside IMG-Help complete the procedure.
Master Data Synchronization -- Customer/Vendor Integration -- Business Partner Settings -- Settings for Customer Integration -- Field Assignment for Customer Integration -- Assign Keys -- Define Number Assignment for Direction BP to Customer
For both, grouping and account group, number ranges should be the same.
Master Data Synchronization -- Customer/Vendor Integration -- Business Partner Settings -- Settings for Customer Integration -- Field Assignment for Customer Integration -- Assign Keys -- Define Number Assignment for Direction Customer to BP
It is very important to have the same fields attributes for both - BUP1 & XD02 customers.
Path to Configure Field Attributes per Activity for Business Partner Field Groupings:
SPRO: Flexible Real Estate Management (RE-FX) -- Business Partner -- General Settings for Business Partner -- Business Partner -- Basic Settings -- Field Groupings -- Configure Field Attributes per BP Role [for FLCU01] & Configure Field Attributes per Activity [for 01 activity]
Path to Configure Field Attributes per Activity for Customer Account Group (ZVFL):
SPRO: Logistics - General -- Business Partner -- Customers -- Control -- Define Account Groups and Field Selection for Customers (t-code OVT0)
The result
In t-code BUP1 we create business partner (General Data):
After Save, XD02 Customer is been creating with the same data views: